Connecting a SIA Connect device
Article version 1.2
Prerequisites
- A SIA Connect device
- User login for the SIA portal on the device
- You have an account on the Inuatek Data Collection Cloud
With the release of DCC version 4.2, adding a new SIA device will automatically generate a SIA "Easy" configuration that includes an MQTT Connector, client certificates and a data simulator, which can be loaded into the SIA device - instantly connecting the device to the DCC!
Some manual labor is still required to get the new SIA device connected. The following section will cover the setup using the SIA configuration file.
1. Create a new SIA Connect device on the DCC
On the DCC, navigate to the IoT administration page. Right-click on the company or folder, in which the new device should be created:
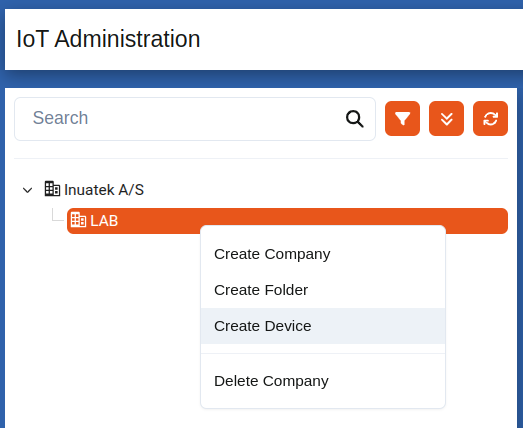
In the dropdown, select SIA Connect.

Choose a name for the new device. The Device Identifier should be the UUID of the SIA device which can be found on the physical device.
Create the device by clicking the Create Device & download Certificates button. A zip archive will be downloaded to your machine with a SIA Connect JSON configuration file deviceConfig.json (the archive also contains client certificates, but they are only needed if the device has troubles connecting to the DCC, see Troubleshooting).
2. Connect the SIA Connect device to the DCC
This section will cover:
- Preparing the SIA Connect
- Importing a SIA configuration
- Viewing data on the DCC
2.1 Preparing the SIA Connect
Before the SIA configuration can be imported, the MQTT and Simulator connector must be installed.
On the SIA portal, navigate to the Connectors tab and search for the MQTT Connector in the search bar:
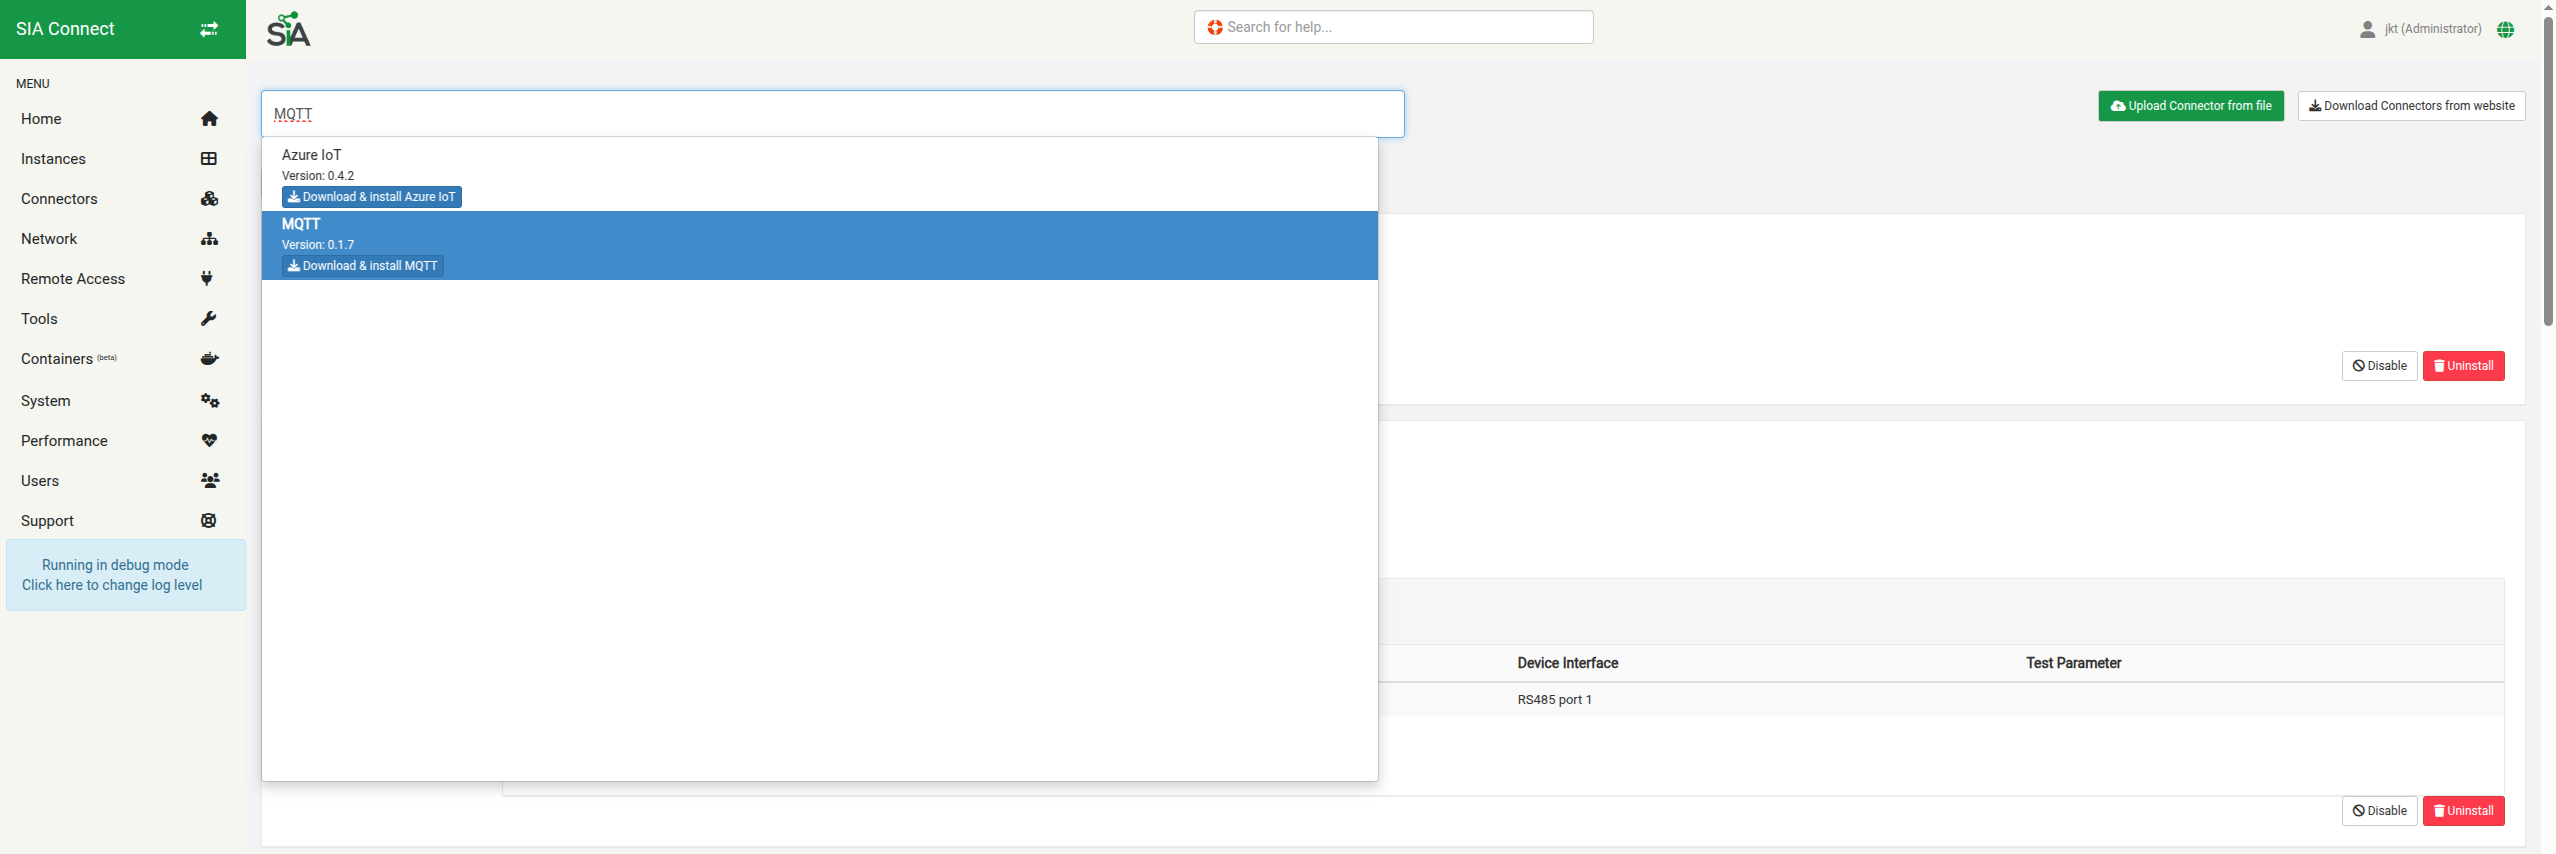
Click the Download & install button.
Once installed, search for the Simulator connector. Download and install this connector too.

2.2 Importing the SIA configuration
Now that the connectors have been installed we can import the SIA Configuration. Navigate to the System tab on the SIA interface. Then, click Import:
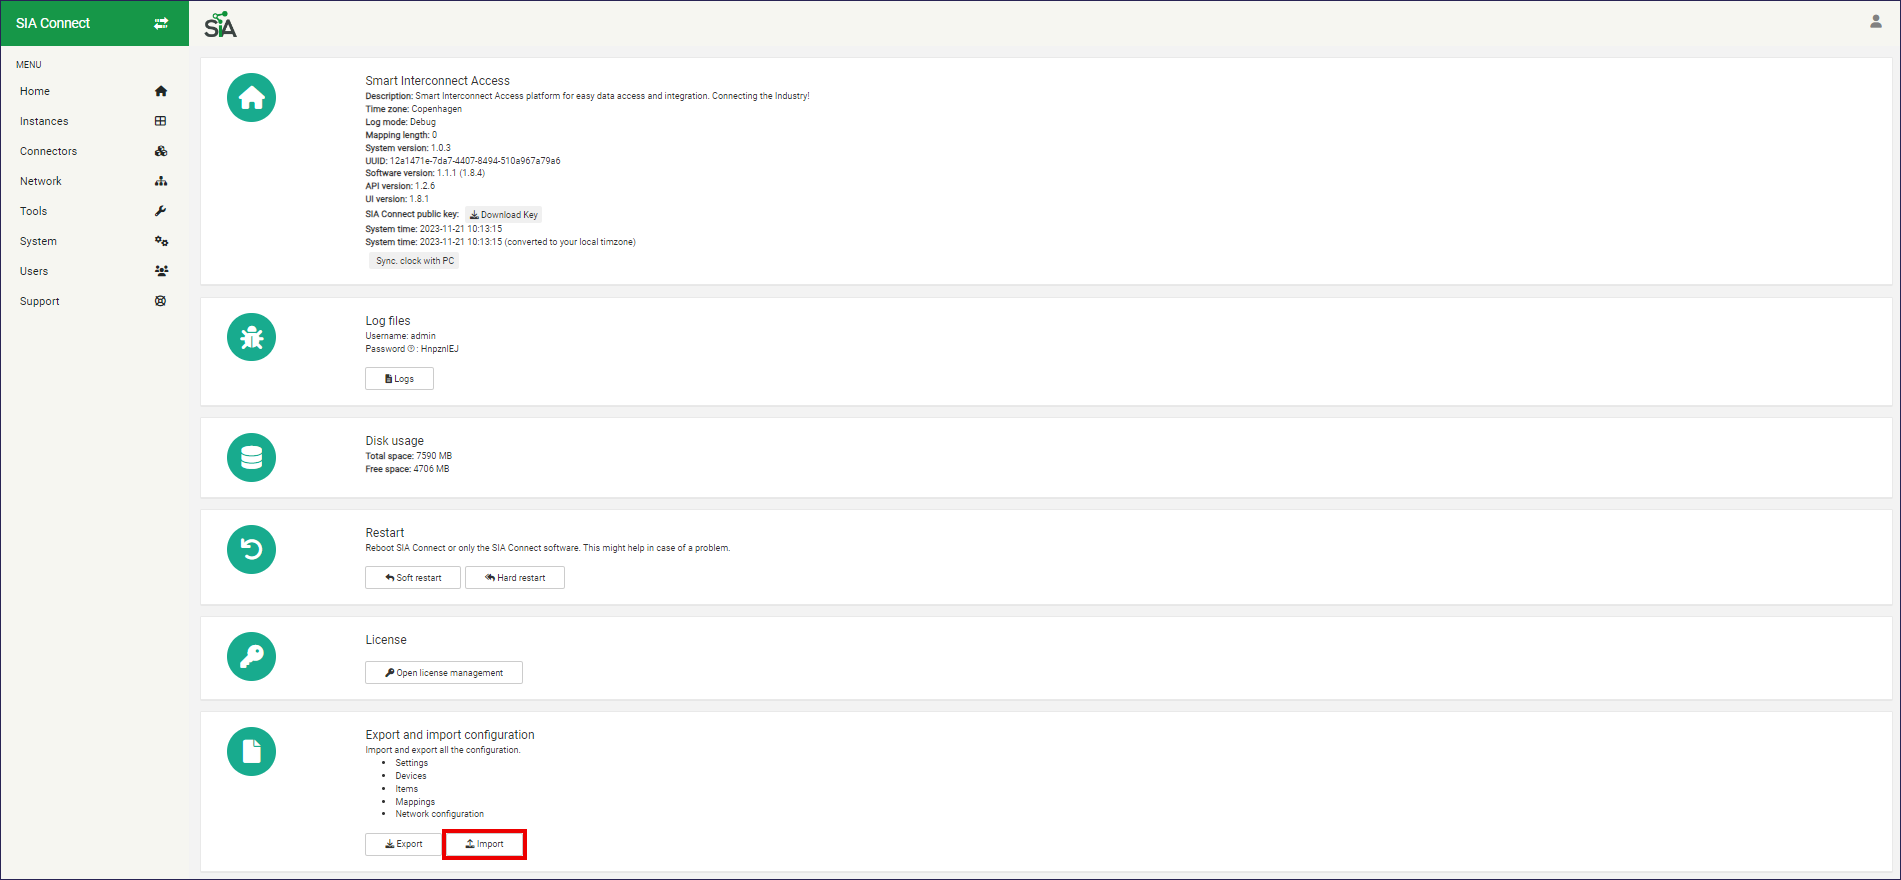
An Import pop-up will appear where you can select the SIA configuration file deviceConfig.json, which was part of the zip archive which was downloaded during the device creation.
Once the configuration has been imported, two new instances should be present in the Instances tab:
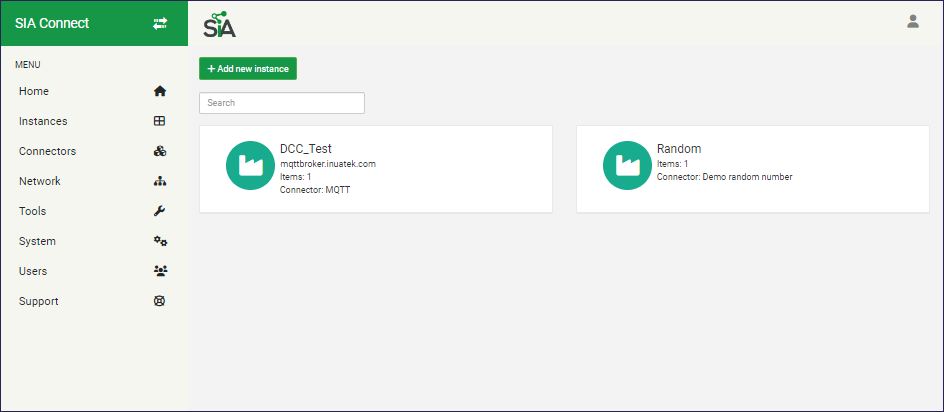
Now the MQTT Instance is configured, as well as a Simulator / Random Number generator Instance.
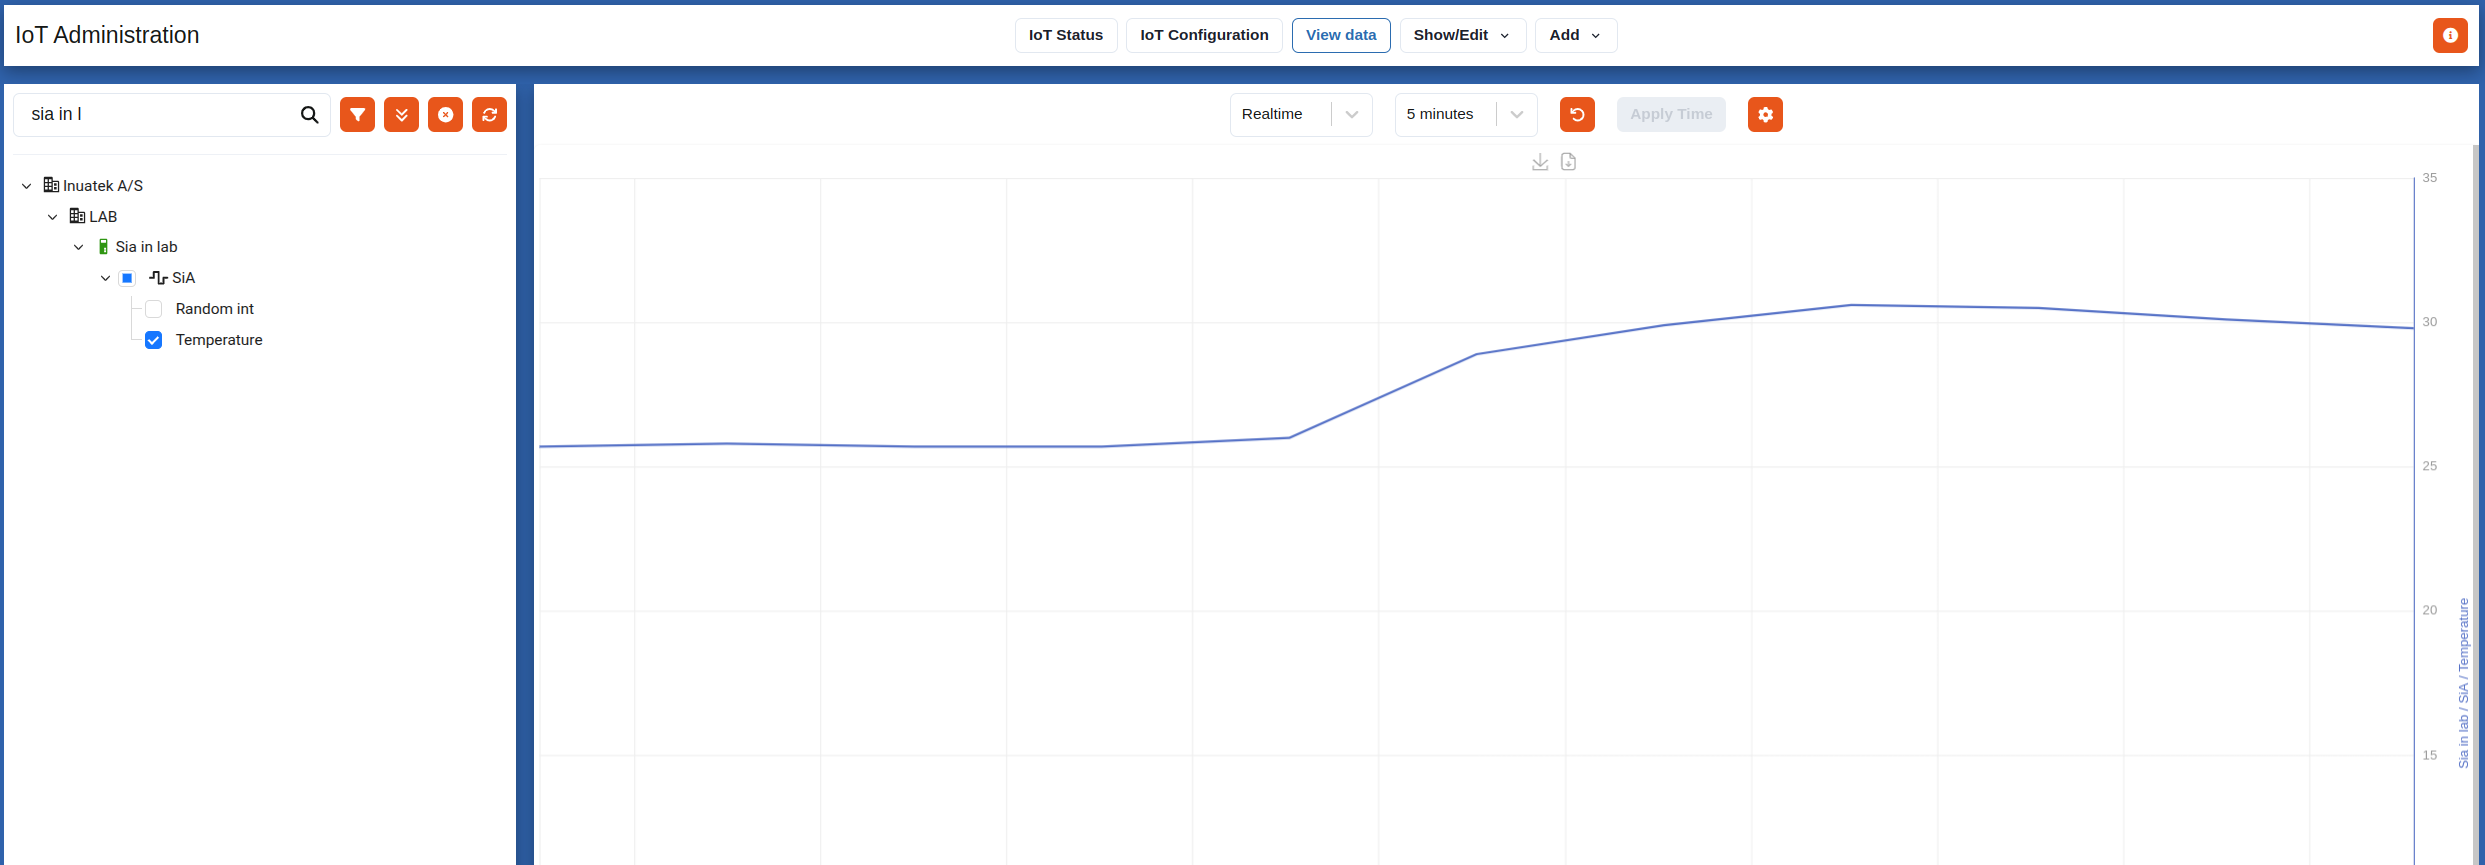
2.3 View data on the DCC
On the DCC, navigate to the Data viewer page. This can be done from the Device status page, or using the menu on the left. On the Data viewer page, select the device and the sample point.
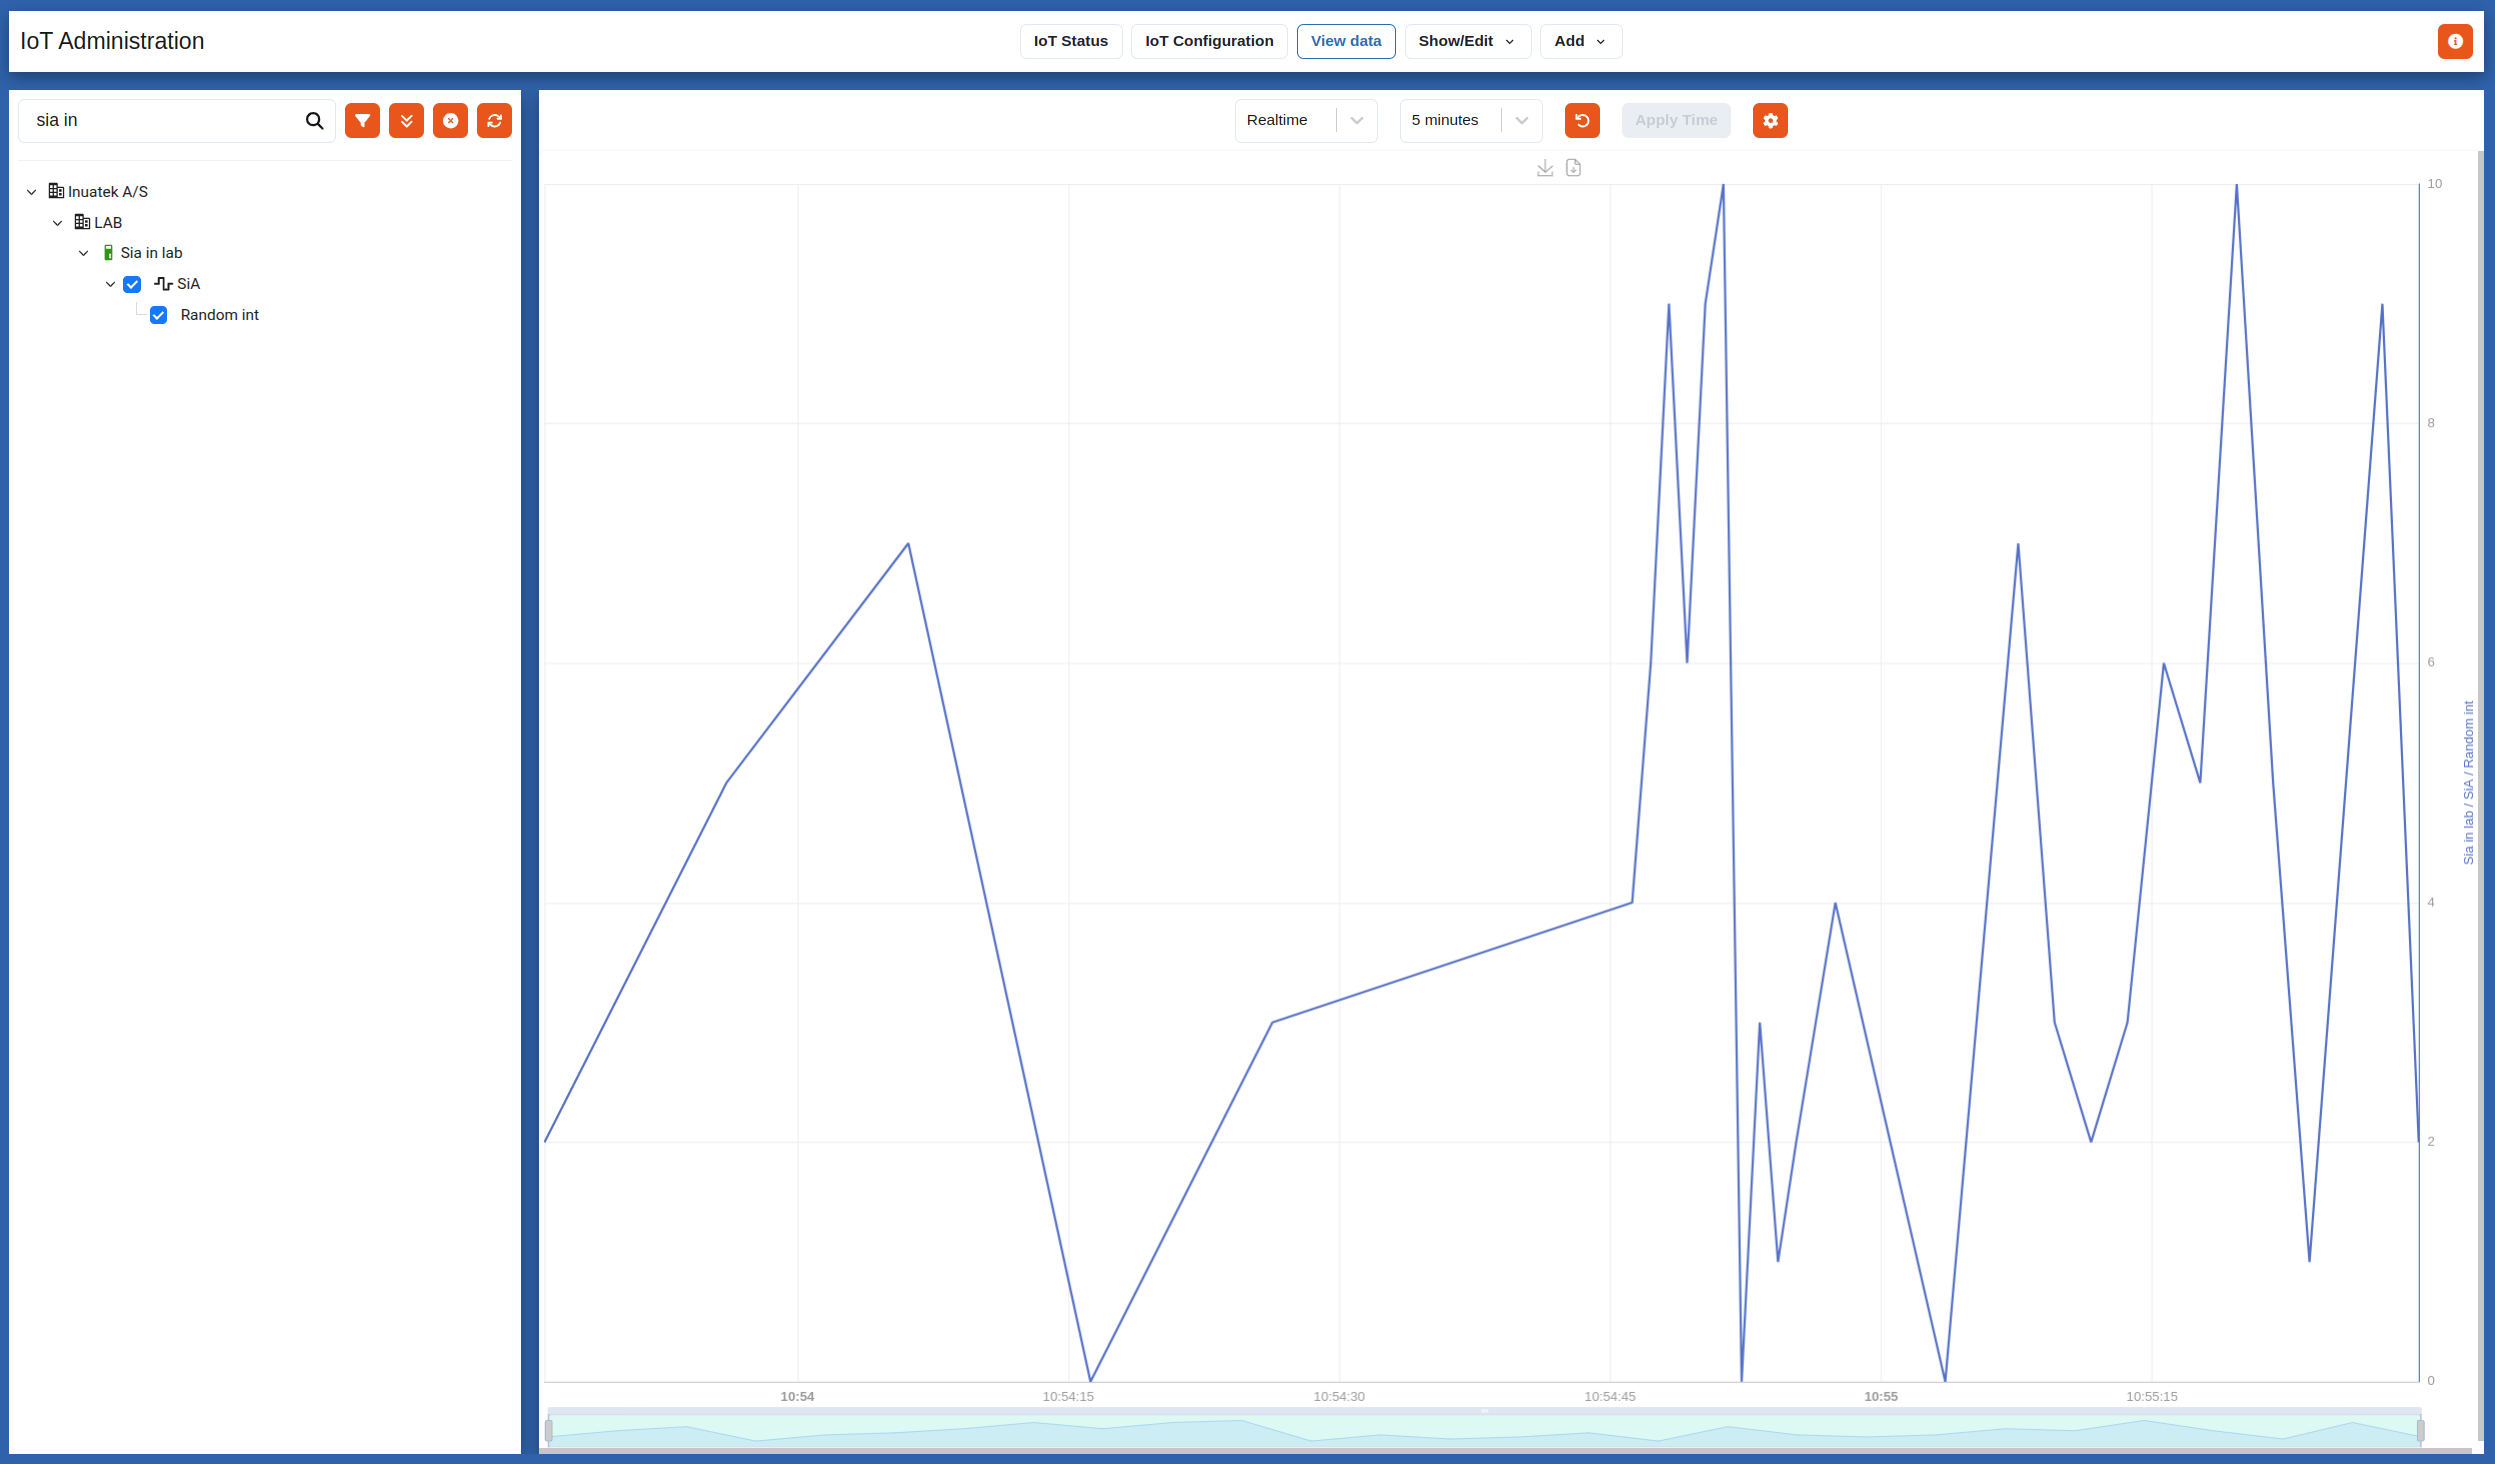
Data is coming through!
3. Setting up real sample points
Now that the device is connected to the DCC and is sending data, we can configure the actual sample points.
This guide will not cover setting up a new Instance such as Modbus or OPC UA, but assume you have already configured an Instance with the desired Items.
For each of the Items, steps 3.1, 3.2 and 3.3 must be completed.
3.1 Preparing an Item for the MQTT payload
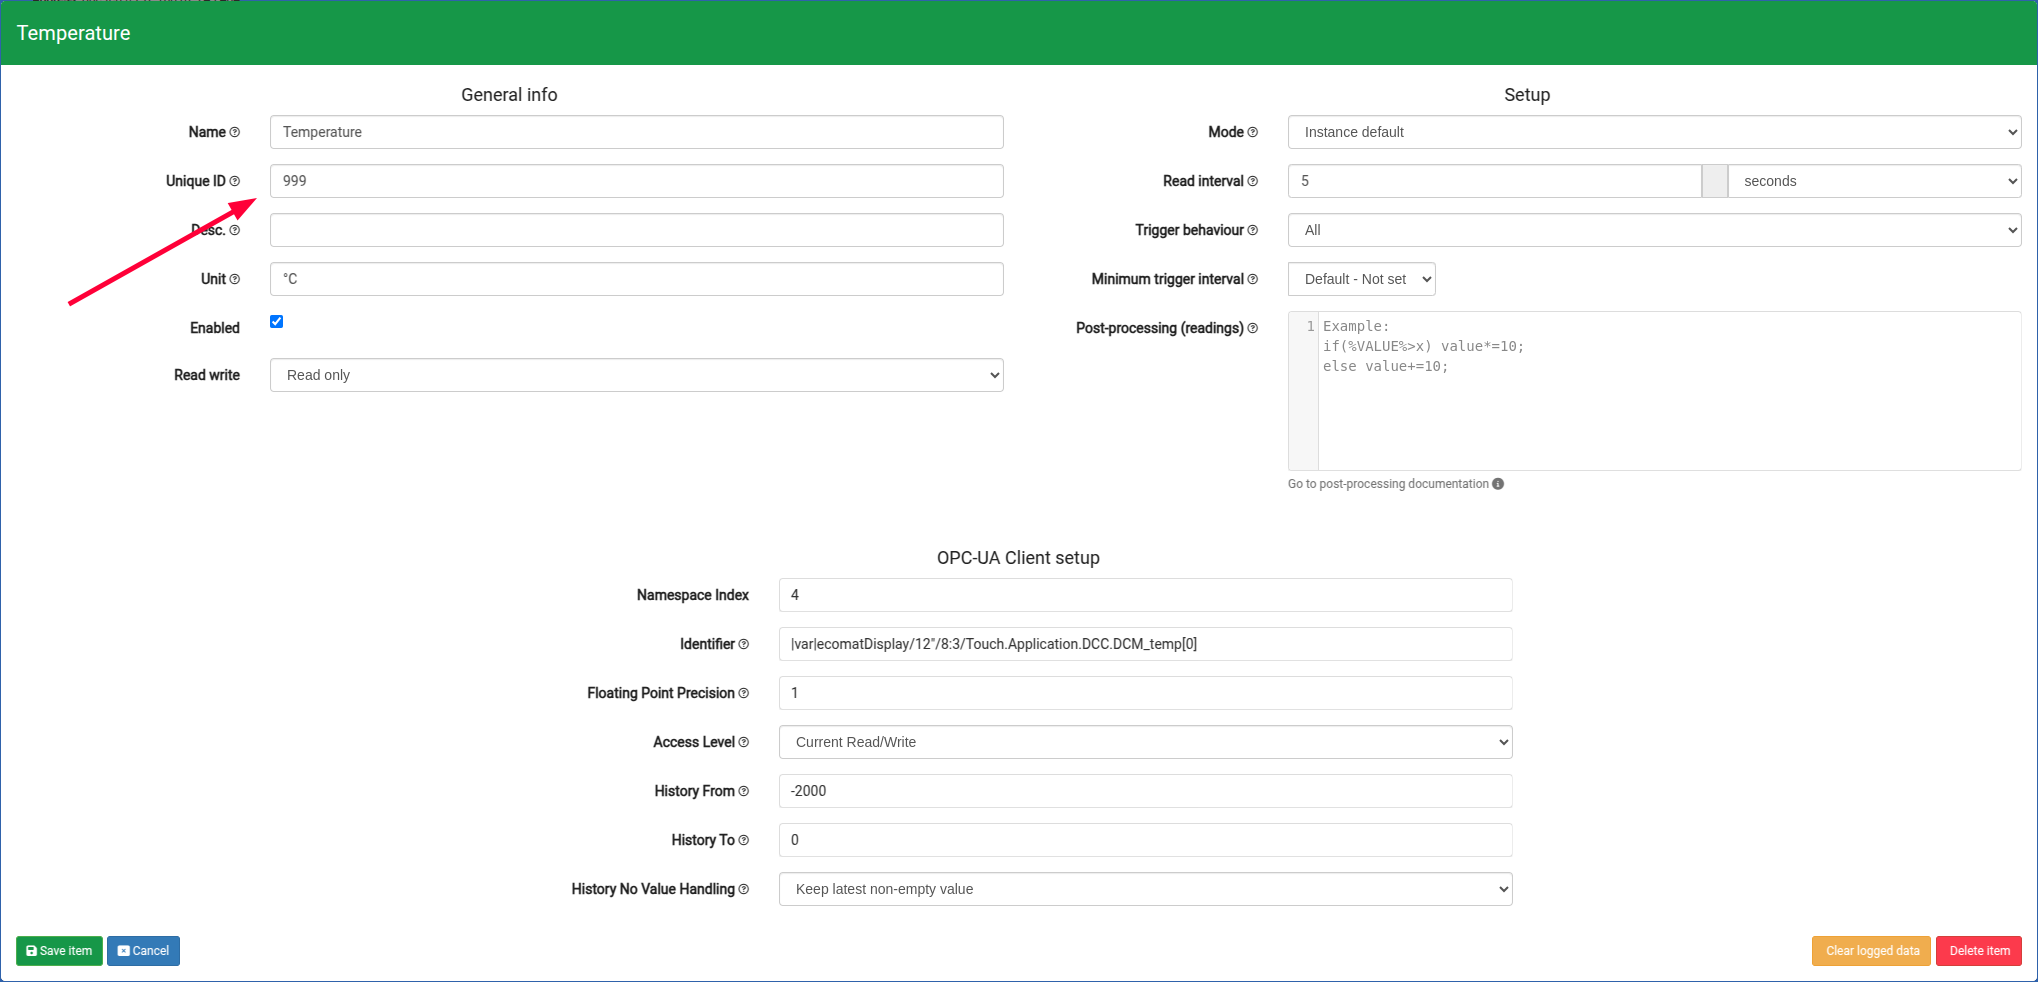
Each sample point must have a unique ID. This is configured in the Item's UID.
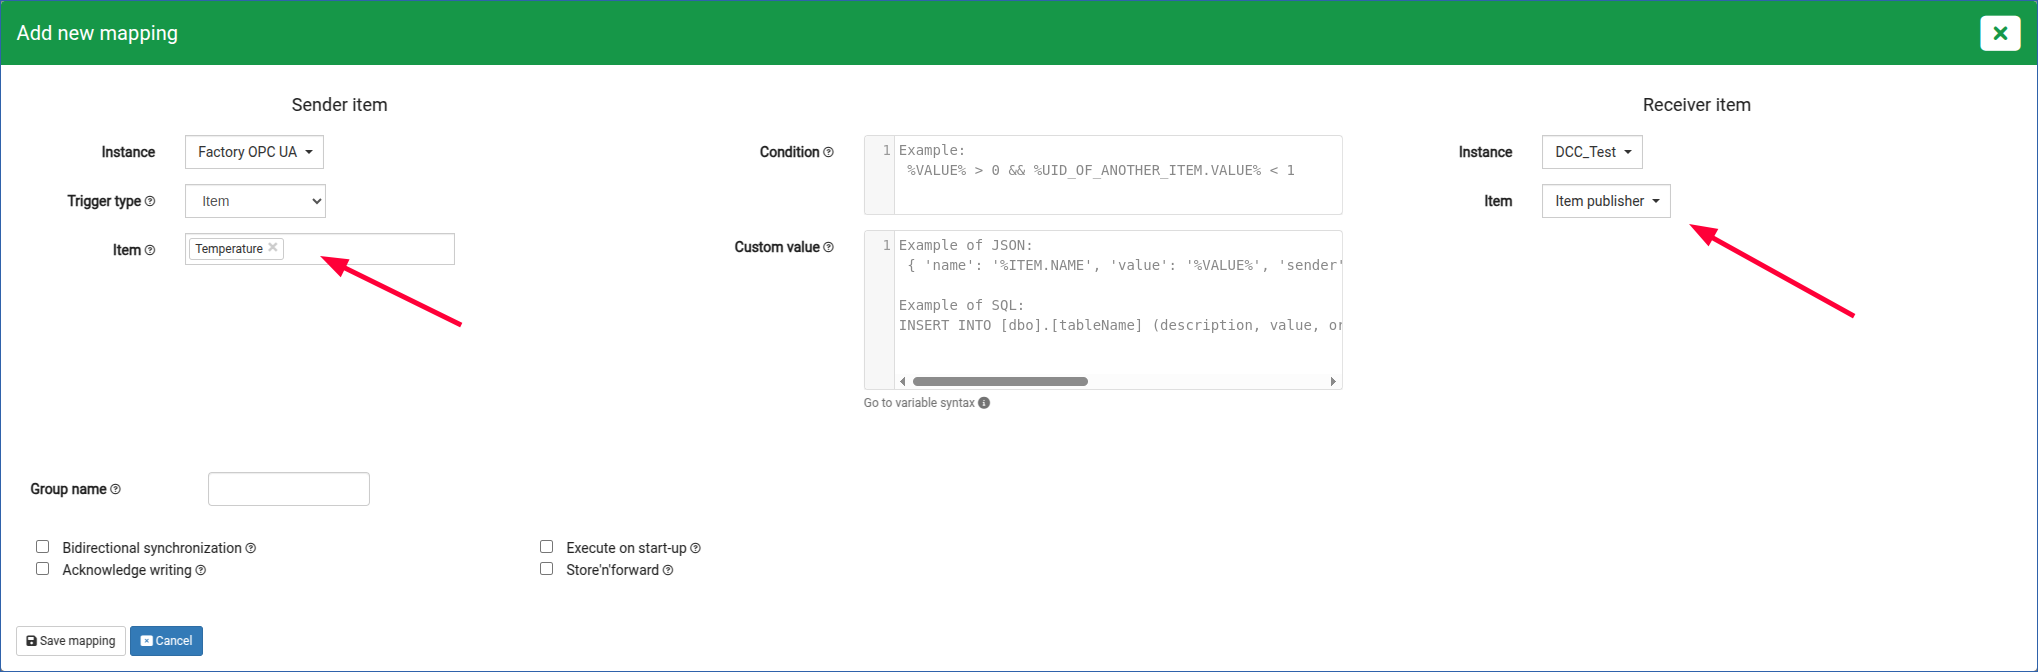
3.2 Setting up Mappings
When the Item has been configured with a UID, a mapping can be created. On the sender side, select the Item. On the receiver side select the Item publisher from the DCC_Test instance.
3.3 Updating the DCC IoT Configuration
The device is now sending the Item's data via MQTT. In order for the DCC to recognize the new sample point we must update the IoT Config of the device.
On the DCC, click the IoT Configuration tab. This will show you the current installed config on the DCC:
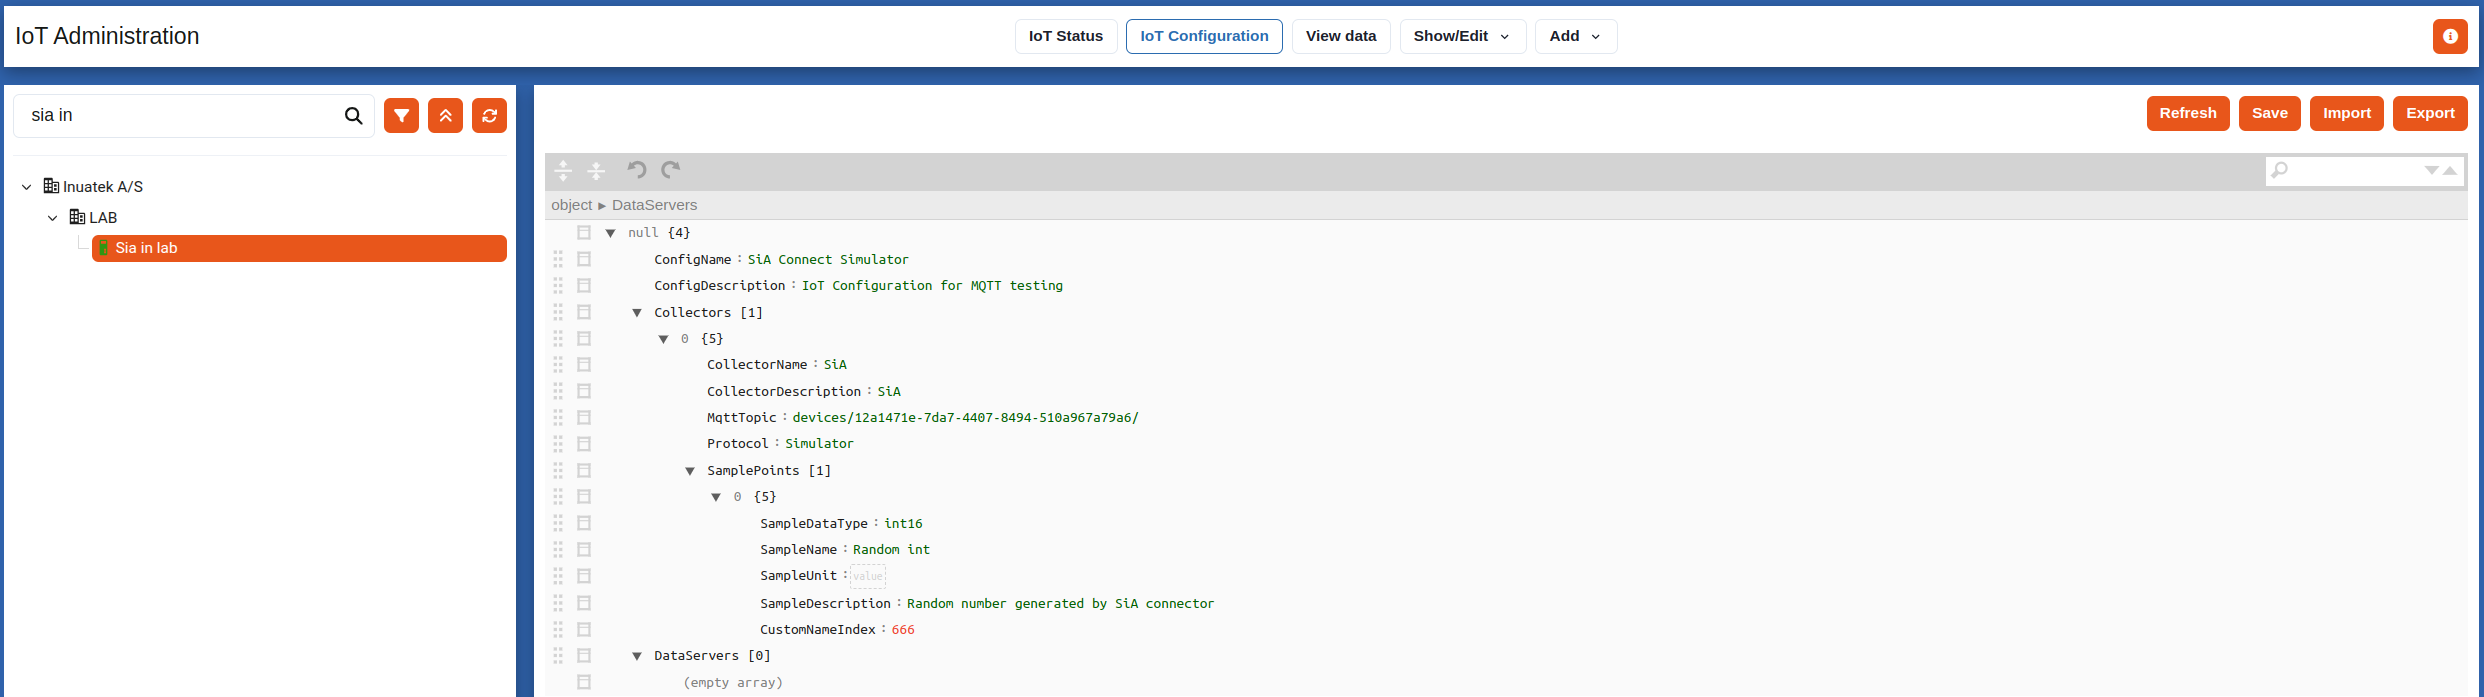
We need to extend the SamplePoints list to include the newly configured point. The format should follow the same format used for the Random int.
- SampleName: Name of the sample point (required).
- SampleDescription: Optional description of this sample point.
- SampleDataType: One of bool, sbyte, byte, int16, uint16, int32, uint32, int64, uint64, float, double, string (required).
- SampleUnit: Optional unit, e.g. KW, °C, RPM.
- CustomNameIndex: Unique ID (UID) of the Item (required).
For this example, the Temperature Item is a floating point value. The JSON for this Item is shown below:
{
    "SampleDataType": "float",
    "SampleName": "Temperature",
    "SampleUnit": "°C",
    "SampleDescription": "Controller temperature",
    "CustomNameIndex": 999
}
To create a new sample point, click the box icon next to the 1st sample point:
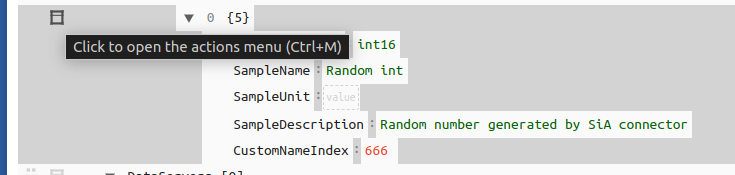
Then select Duplicate from the menu. This will create a duplicate of the Random int sample point. Then it is just a matter of updating the new sample point with the correct information. The final configuration should look like:

Finally, click the save button to save the changes. Click Refresh to see the updated configuration.
You can now navigate to the Data viewer to see data for the new sample point:
Congratulations, you have now configured your first custom sample point! Repeat this process for the rest of the sample points, which should be sent to the DCC.
Troubleshooting
This section cover some common problems when trying to connect and send data using a SIA device.
Data not coming through on the DCC
The UID of an item may not have leading zeros. Since the UID is used in a JSON structure, this is considered an invalid JSON string, see The JavaScript Object Notation (JSON) Data Interchange Format.
Trailing comma after the last key-value pair in the Connector Template is considered invalid JSON.
Make sure the MQTT Topic configured in the Connector Setup contains the base MQTT Topic that was provided when the device was added on the IoT Administration page.
Invalid IoT Configuration on the DCC
If you are having troubles configuring the IoT Configuration on the DCC, you may export the configuration to JSON, and edit it with a text editor. On the DCC, the following default configuration for the SIA Connect should be present:
{
    "ConfigName": "SiA Connect Simulator",
    "ConfigDescription": "IoT Configuration for MQTT testing",
    "Collectors": [
        {
            "CollectorName": "SiA",
            "CollectorDescription": "SiA",
            "MqttTopic": "devices/SIA_Connect_<UUID>/messages/",
            "Protocol": "Simulator",
            "SamplePoints": [
                {
                    "SampleName": "Random int",
                    "SampleDescription": "Random number generated by SiA connector",
                    "SampleDataType": "int16",
                    "SampleUnit": "",
                    "CustomNameIndex": 666
                }
            ]
        }
    ],
    "DataServers": []
}
You need to edit or extend the SamplePoints list to include the correct point(s). The format should follow the same format used for the Random int.
SampleName: Name of the sample point (required).
SampleDescription: Optional description of this sample point.
SampleDataType: One of bool, sbyte, byte, int16, uint16, int32, uint32, int64, uint64, float, double, string (required).
SampleUnit: Optional unit, e.g. KW, °C, RPM.
CustomNameIndex: Unique ID (UID) of the Item (required).
For this example, a Temperature Item with a floating point value will be added. The JSON for this Item is shown below:
{
    "SampleDataType": "float",
    "SampleName": "Temperature",
    "SampleUnit": "°C",
    "SampleDescription": "Controller temperature",
    "CustomNameIndex": 999
}
To make changes to the IoT Configuration of your device, export the configuration on the IoT Configuration page:

Then, using a text editor, add the new sample point to the SamplePoints list. The final configuration should look like:
{
    "ConfigName": "SiA Connect Simulator",
    "ConfigDescription": "IoT Configuration for MQTT testing",
    "Collectors": [
        {
            "CollectorName": "SiA",
            "CollectorDescription": "SiA",
            "MqttTopic": "devices/SIA_Connect_<UUID>/messages/",
            "Protocol": "Simulator",
            "SamplePoints": [
                {
                    "SampleName": "Random int",
                    "SampleDescription": "Random number generated by SiA connector",
                    "SampleDataType": "int16",
                    "SampleUnit": "",
                    "CustomNameIndex": 666
                },
                {
                    "SampleName": "Temperature",
                    "SampleDescription": "Controller temperature",
                    "SampleDataType": "float",
                    "SampleUnit": "°C",
                    "CustomNameIndex": 999
                }
            ]
        }
    ],
    "DataServers": []
}
Finally, upload the new configuration on the DCC. Once the configuration has been loaded on the DCC, the new sample point will be present. Navigate to the Data viewer to see data for the new sample point.
SIA Device is having troubles connecting to the DCC via MQTT
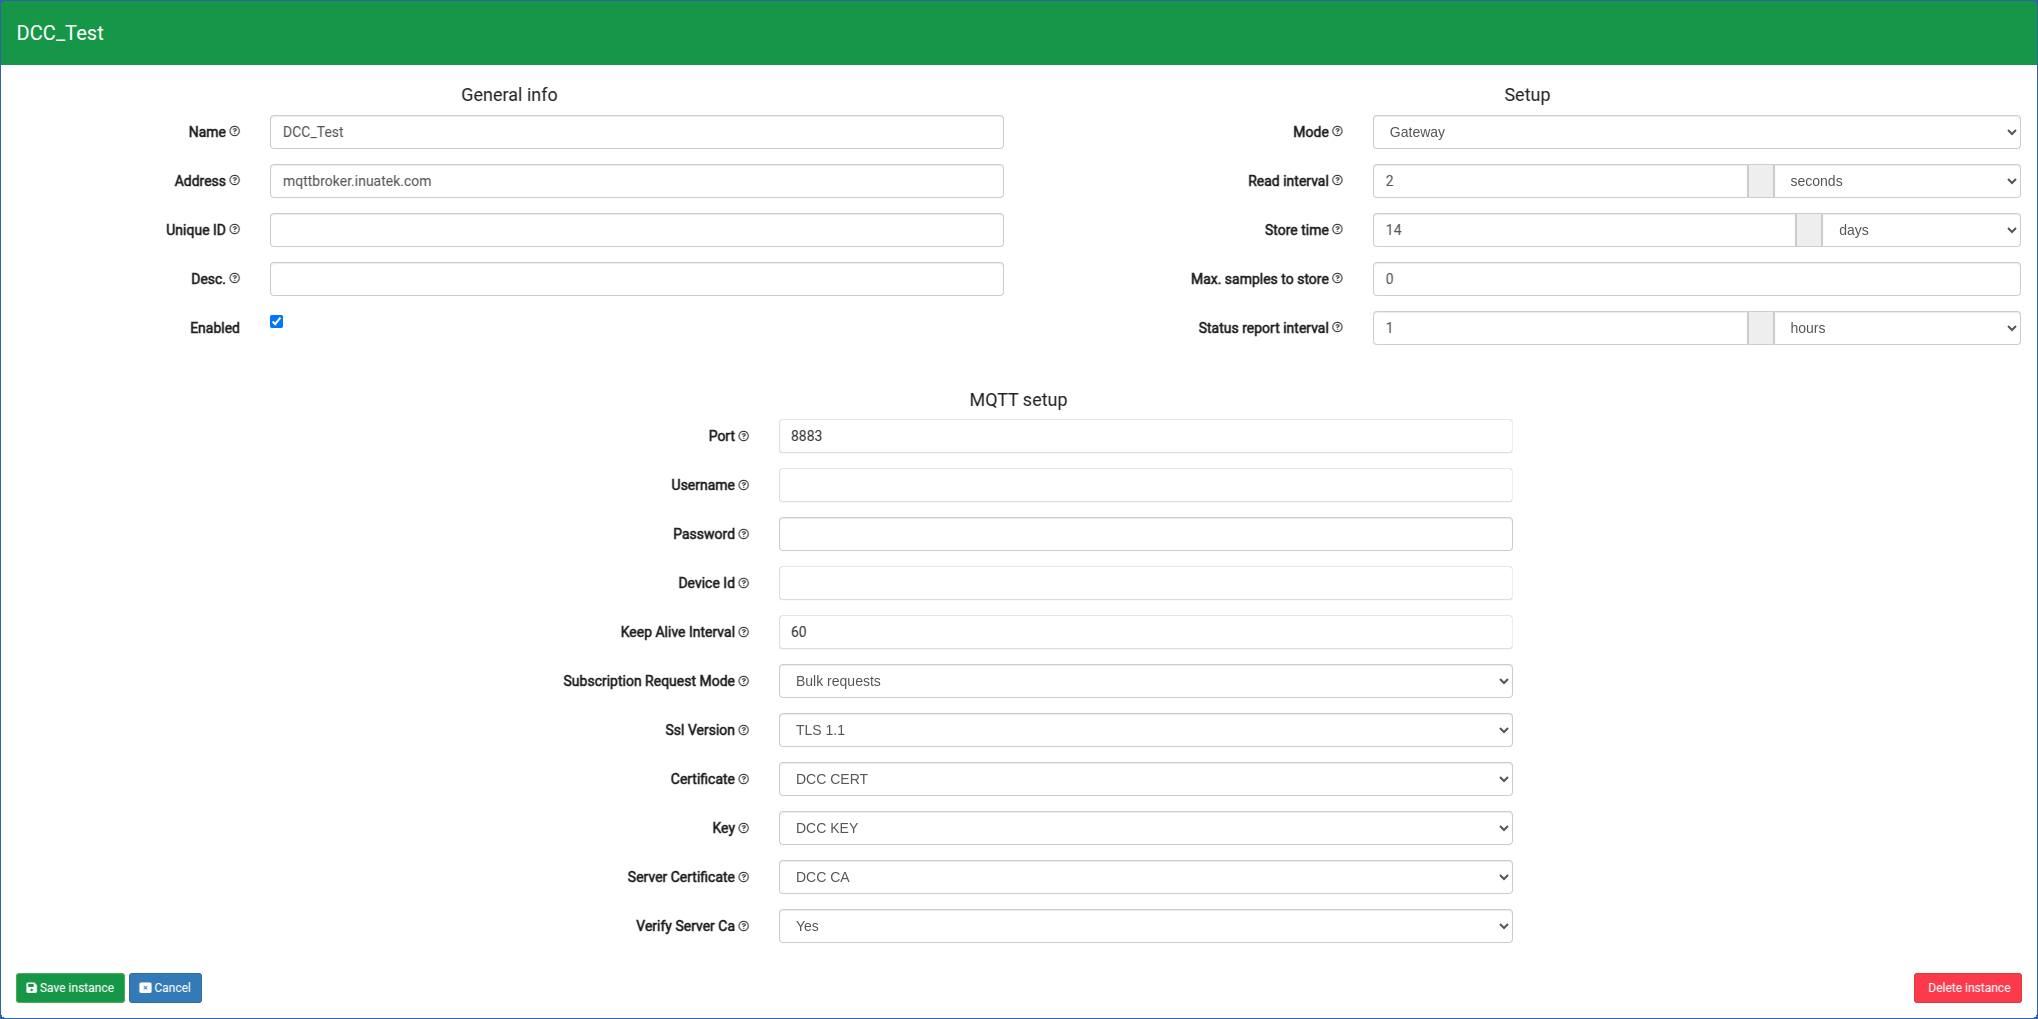
If you imported the configuration obtained from the DCC onto the SIA Connect device, the MQTT certificates should already be loaded on the device. Open the DCC_Test instance to verify the connector has been successfully initialised with the certificates loaded properly.
If you do not see any certificates in the three dropdowns, you may try to manually upload certificates.
When the MQTT device was created on the DCC, the zip archive also included a set of certificates. If you have lost the file, you can always re-generate a new file-set on the IoT Administration page (see Security). Note that the previous certificates are then automatically revoked.
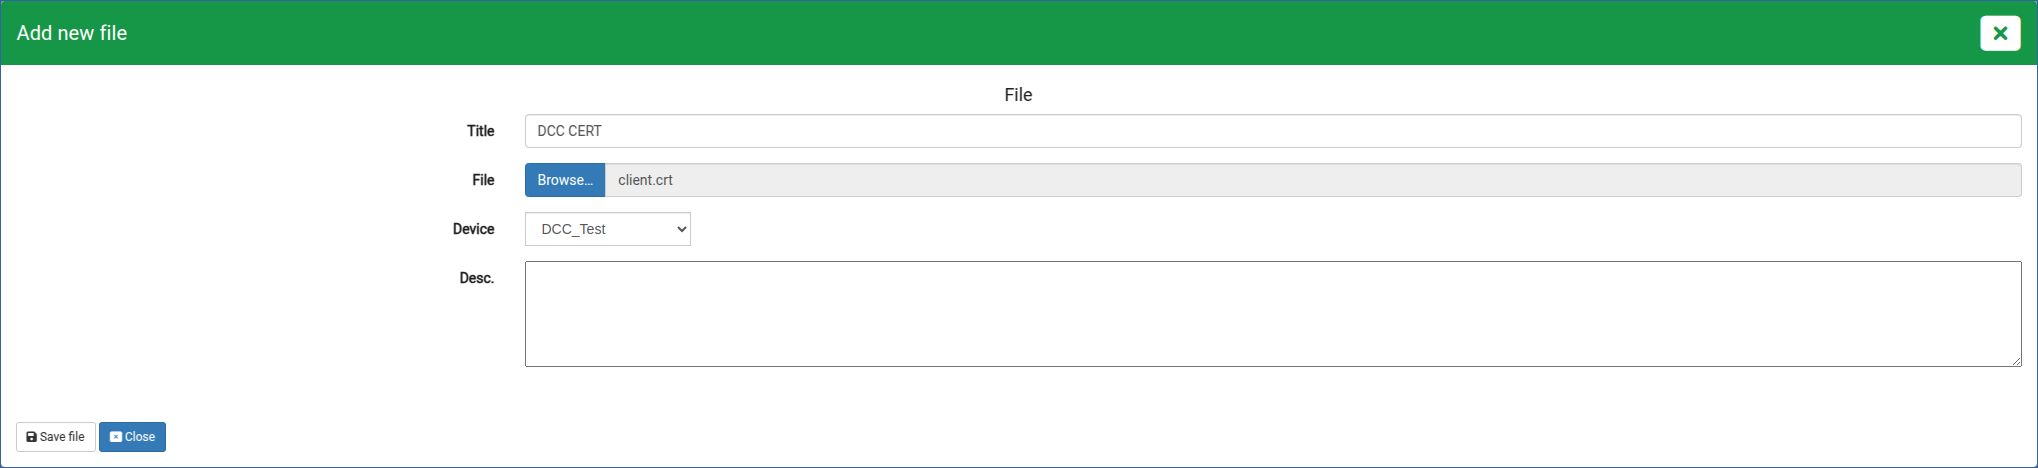
Navigate to Connectors page on the SIA portal. Find the MQTT Connector and click Add new file and upload the three files:
- ca.crt
- client.crt
- client.key
The files must be uploaded individually. When uploading a file a Title must be provided. You are free to choose the Title yourself. In this example the following Titles are used:
- ca.crt : DCC CA
- client.crt : DCC CERT
- client.key : DCC KEY
In the Device dropdown select the MQTT Instance. Finally, click Save file. Repeat this for each file.
Selecting the correct certificates
Finally, the certificates must be selected in the Connector setup of the MQTT Instance. Do this by navigating to the Instances tab, and selecting the MQTT Instance. Click Edit instance and select the certificates in the Connector setup:
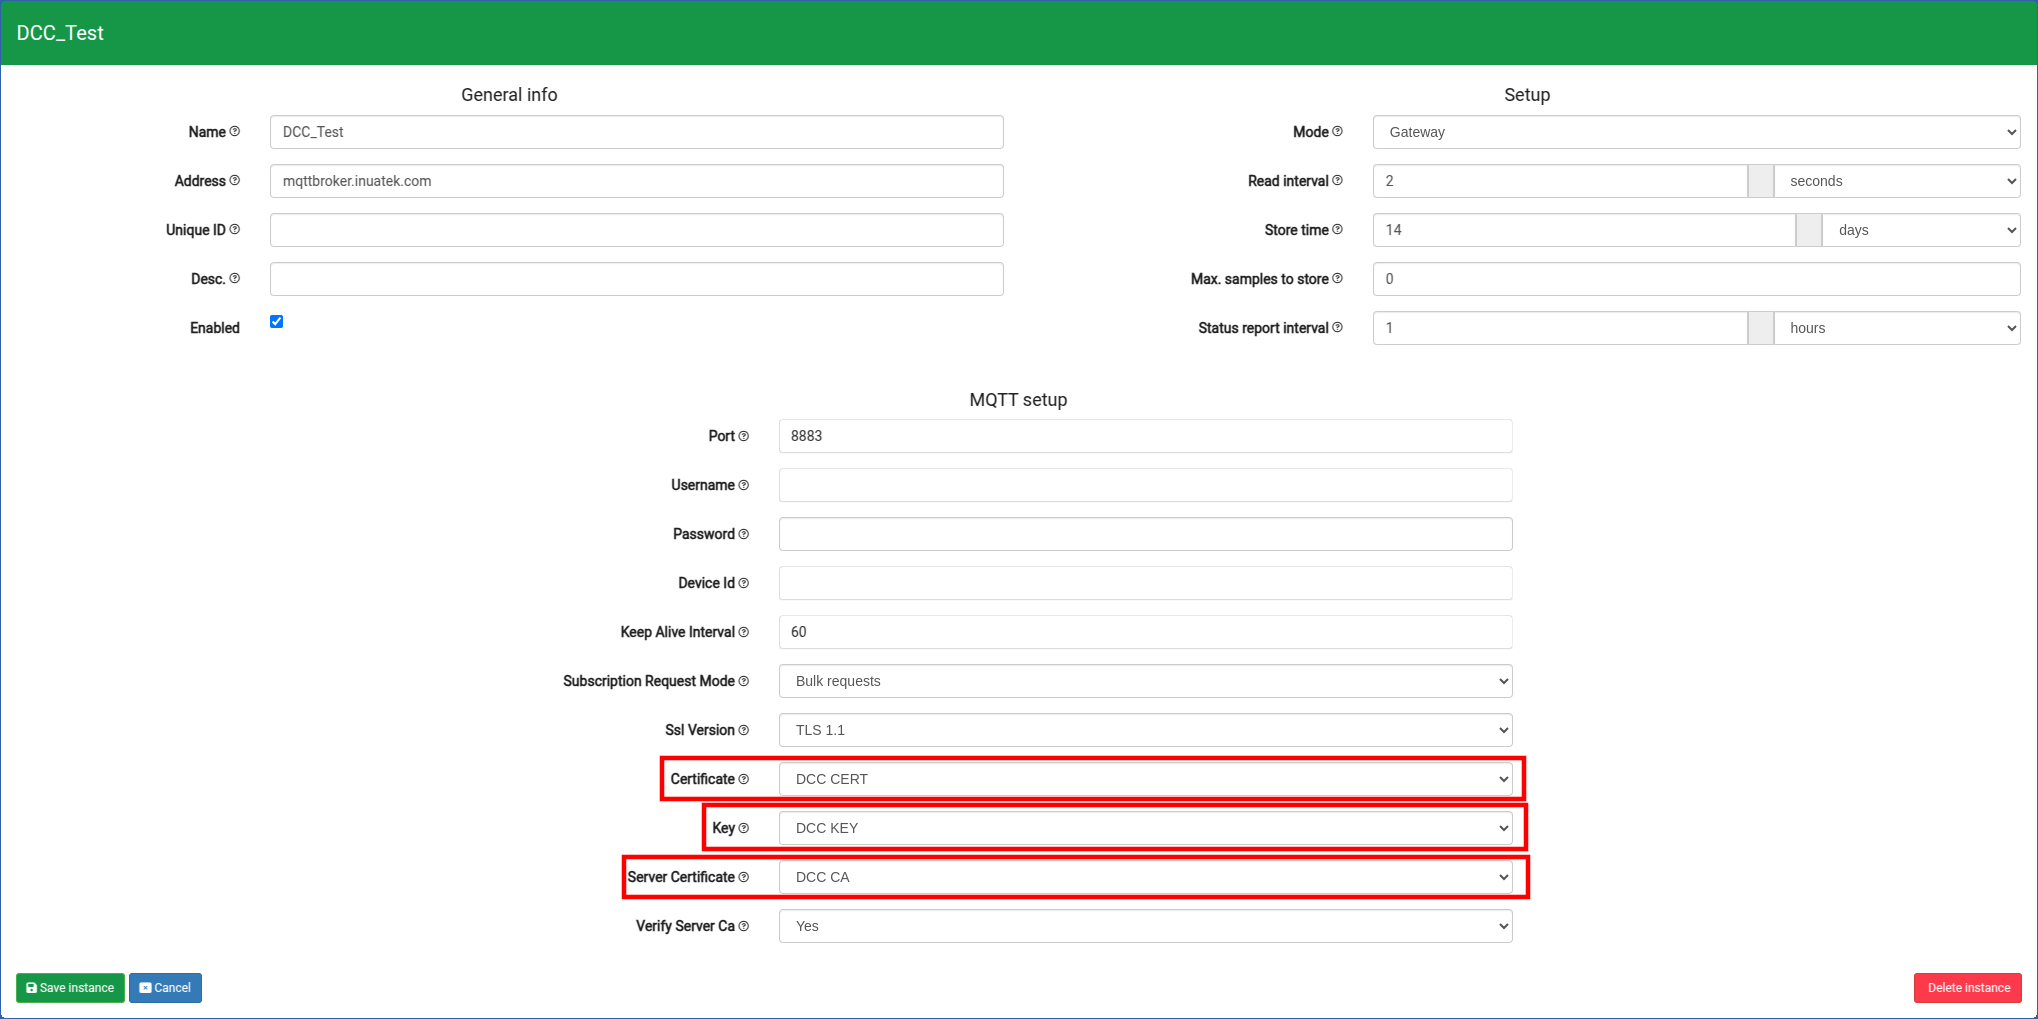
- Certificate: Select the client.crt uploaded previously
- Key: Select the client.key uploaded previously
- Server Certificate: Select the ca.crt uploaded previously
Click Save instance. The setup is now complete and the device should be able to connect to the DCC.
However, you can re-generate the certificates from the DCC.
- When selecting which certificates to use in the Connecter setup, make sure the client.crt and ca.crt are selected correctly.